Construct the Climbing Wall Framework
Framing your climbing wall should start with setting your anchor to the ceiling and floor. The framework is secured by the anchors which are the end points of the continuous load path from the ceiling to the floor. A continuous load path is how the weight of the wall and the live loads from the climber are transmitted from the top overhanging section to the floor.
This example shows anchoring to a finished ceiling and to a concrete floor. However if your ceiling joists are exposed you may be able to attach your studs directly to them. If you can't line up your studs with the ceiling joists install a top anchor in the same way shown for the finished ceiling below.
 Anchor to Ceiling
Anchoring to the ceiling joists. The climbing wall must be securely anchored to the ceiling and floor. There are exceptions, for example stand-alone walls --but usually for a home climbing wall there will be a ceiling which can be used to anchor the top plate.
Anchor to the floor. The bottom plate in construction terms is the bottom horizontal piece that connects the studs. Mark the location of the bottom plate. Find the location for the studs and mark an anchor point in between them. If you have a wood floor you would not use concrete anchors of course, use lag screws into the floor joists. If you have a concrete floor use concrete anchors
 Anchoring to a Concrete Floor
Using a concrete anchor. Position the 2x4 or 2x6 bottom plate and drill through the bottom plate until your wood drill bit just touches the concrete. Move the bottom plate and change drill bits to a concrete drill bit. Drill into the concrete the length of the concrete anchor. In this example I am using a wedge anchor. Next, pound the wedge anchor through the bottom plate into the hole in the concrete so there is about a quarter inch sticking up above the bottom plate. Using a socket or wrench tighten a nut and washer on the wedge anchor. Install several wedge anchors as appropriate to secure your climbing wall base in place.
To anchor to a concrete floor 1) Drill a pilot hole, 2) insert the wedge anchor, 3) tighten the nut.
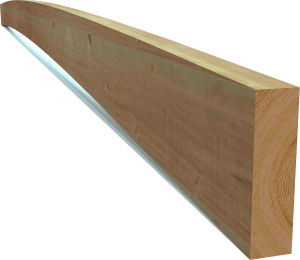
 Joist with bend, crown up
Joist Layout. Long joists will not be perfectly straight. Before installing any long wooden member, check for straightness by sighting down the edge. The high side is called the crown. Position the crown at the top. A joist will rest on top of a beam or will anchor to a ledger or header board (which attaches to an existing facility). You can measure from either end of the anchoring ledger. Joists must be spaced on 16-inch centers due to the additional weight they must support. Set the joists in place and check for square to make sure each joist is perpendicular to the ledger. Mark the locations of the joists using a pencil. Toenail the joists in place temporarily using 12-penny nails. Predrill holes for screws, one on each side. Attach the joists to the beam or ledger using screws and remove the temporary toenails.
Framework. It's easier to frame and easier to square and measure sections on the floor. This isn't always possible with irregular shapes and sections that fill gaps. Small walls, eight feet in height can be constructed using two by four studs. Walls higher than one sheet of plywood are better framed with 2x6 studs. Tack the outer frame pieces together with a small nail before you are square the frame. This is done to keep the pieces from moving out of place as you make adjustments. Measure and mark the locations for the inner studs. Make your measurements from the same side at the top and the bottom. Assemble the panel framework using screws. Drill two holes with an 1/8" drill bit at the locations the screws will be installed. This will make it easier to screw the joints together without having the Phillips driver bit pop out and strip the screw head. Re-check the square of the frame, then screw the frame together.
 Diagonals are equal if square
Check for Squareness. Measure diagonally from opposite corners. Both diagonal distances will be equal if the frame is square. Adjust the the frame until both diagonal measurements are equal. Recheck the square of the frame, then screw the frame together with 3-inch screws. Screw the frame together using 3 or 4-inch self-tapping screws. Do not use nails. A stud is 1 1/2 inches thick. When the two are screwed together, the screw must go through the thickness of both, for a total length of 3 inches. Price exterior self tapping wood screws on Amazon.
 3 or 4 inch screws
If the frame runs floor to ceiling it should be assembled in place, not on the floor then lifted into place. The reason for this may not be apparent at first. When installing a wall under a ceiling, a wall that is build exactly the same height as the ceiling will jam when you attempt to lift it from the floor and rotate it into place. This is because the distance between opposite edges of a frame (top front to bottom back) is greater than the length of the frame. Remodeling framers make their walls a little shorter, then shim the gap. This is not a good procedure for framing climbing walls. A climbing wall frame should fit securely with as little gap as possible.
If the frame is a small, modular section of a larger framework it's easier to assemble it on the floor. To assemble a frame on the floor you will assemble the frameworkstart with the outer frame pieces first. Just tack them together with a small nails before you square the frame. This is done to keep the pieces from moving out of place as you make adjustments. Leave about 1/8 inch of the nailhead sticking up so you can remove these nails later.
 Climbing Wall Framing
Build the climbing wall frame. Make sure there is a continuous load path to the floor, and that the climbing wall is securely anchored to the ceiling and floor. Anchor the Climbing Wall to the ceiling and floor. Use Structural Connectors to strengthen joints.
In this example ceiling height is 9'. There is a raised section at the bottom for the mat and fallzone. The climbing surface does not go all the way to the ceiling but the supporting framework does extend to the ceiling and is anchored to the ceiling joists. The studs run parallel with the ceiling joists and are able to be anchored directly to them. For cases where the support studs cannot be attached directly to the side of the ceiling joists mount a 2x6 across the ceiling joists and secure the studs with a joist hanger or other suitable structural connector.
 Drill T-Nut Holes
Use 5/8" plywood. The reason to use 5/8" plywood is due to the size of the t-nut. The t-nut is 1/2", so if you use the thinner 1/2" plywood the thickness of the t-nut will prevent tightening the hold. Why use plywood? See Plywood vs OSB for Climbing Walls.
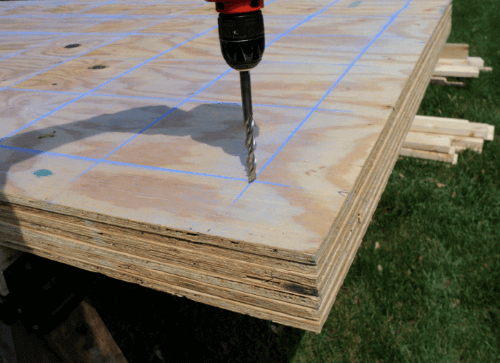
Drill the t-nut holes (but don't install the t-nuts yet). Stack several sheets on top of each other, clamp them together so they won't shift and drill through all the sheets at the same time. Mark the t-nut locations with a chalk line, starting 4" from the edge then 8" apart.
 Cut Plywood to Shape
Cut the plywood sections to size. Just cut it, make sure it fits the frame by placing the plywood pieces on the frame, but don't screw on the plywood to the frame just yet; you need to install the t-nuts first. If your wall has angled sections cut the plywood with a bevel, in otherwords the angle you set the saw blade when making the cut. The key to making nice joints is getting the bevel set correctly. For oddly shaped sections, ie the sections that fill in gaps between angled pieces, see Cutting-Irregular-Shapes.
Install t-nuts after cutting the plywood sections and before installing the plywood onto the frame. The reason to install t-nuts before screwing the plywood onto the frame is because it is pretty difficult to pound the t-nuts in to a vertical or inclined sheet of plywood. If your plywood is on the frame when you try to install the t-nut it will bounce and won't easily go into the hole. See How to Install T-Nuts.
Installing the plywood panels
 Plywood Climbing Wall
Large sections. In the example on the left the entire framework was assembled in place. Large sections like this are easier to build and mount the plywood in place.
Smaller modular sections. If your sections are small or modular you can install the plywood to the framework before the section is installed on the wall, in otherwords, assemble the entire modular section then mount it to the wall.
Leave a little gap between the panels. Do not press the plywood tightly against an adjoining piece of plywood. Leave a very slight gap. Plywood will expand and contract with humidity and temperature changes. This will ease the stress on the anchors, screws, and bolts holding the wall together.
Screw the plywood in spacing the screws every 10".
Also see:
Routesetter's Wrench
Climbing Holds
How to Install T-Nuts
T-Nuts
Bolts for Holds
Rise-Run Online Calculator
How to Make Climbing Holds
